I wanted to share three of the main projects that I worked on. I always appreciate & frequently use craft tutorials, and would like to exchange the favor to the blog universe! I will be showing how to make an invitation pennant banner, a unique cake stand with vase, and a ribbon topiary.
PENNANT BANNER ON INVITE
Although I stick mostly to digital invitation design, I just love adding a 3-D aspect to my personal invitations...it's that love for all things scrapbook-y that needs to come out!! I also have a secret obsessment with banners/pennants/bunting that has to be addressed every so often. This invitation design was basically a little piece of heaven for me.
Since I digitally designed the invitations first, I made sure to leave a nice, wide open space in the top corner-- and a right angle corner is a real must for this kind of banner too.
 Here are all of the materials I used:
-your choice of cardstock paper
-pencil
-sharp scissors
-your choice of string/baker's twine (I used Doodle Twine in Limeade :)
-elmer's clear glue (white glue would work on a white invite)
-glue pen (optional)
-stamps & ink pad (optional)
Although you could easily leave the pennants blank, I wanted to stamp the date of the party onto mine, so that's why I needed the number stamps and ink pad!
First, you will need to cut out a template triangle in order to decide how big you want the pennant to be. I wanted to fit three across the corner, so I tried different sizes to see what worked. When you have decided on the size, take the piece of cardstock you are using & **fold it in half** so there is plenty of room to trace your template triangle on to one side.
after tracing, cut out with your scissors & you should get a little folded pennant like this:
this is when I stamped my pennants with number stamps;
also time to measure out your twine & tie it in a loop to fit over the invite;
I measured mine so that it would be two inches from each corner
I used a dab of elmer's clear glue on my finger to attach the twine to each edge of the invite,
it dried quickly and stayed well attached--- then it's time to attach the pennants:
slip the pennant over the string & use a glue pen/dot of elmer's
to glue the pennant sides together; press the pennant down firmly so it dries &
lays flat over the twine; pennants should still be able to move along the twine
The back of my invitation had a design as well, so I added
another larger pennant to the back, using a different cardstock pattern:
They turned out so cute! I got tons of compliments.
Here are two copies of the invite to show you the front & the back sides.
CAKE STAND WITH VASE
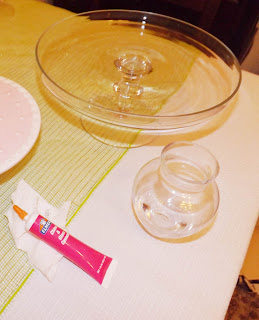
This has got to be the easiest way to update a cake stand! I wanted to display my cupcakes on two tiers, but add something a little special to the top. This round, glass cake stand was an awesome, cheap find at a garage sale.
I grabbed a small, clear vase from my overflowing flower vase cabinet (y'all have that cabinet too, right!?) & my Elmer's China & Glass Cement, & then glued these two together....seriously, I did this the night before the party & just let it set overnight. The next morning I wrapped & secured some of my party ribbon around the middle, just in case any dried glue tried to peek out!
I added two pretty Gerber daisies in water to the vase & voilà! Super cute DIY cake stand with vase! I set the finished product on top of a square, white cake stand for the total effect. I think it really added a little something special!
Hope this inspires you to get crafty too!!


